Setting a static IP in Ubuntu is useful for a lot of things. You may want to forward ports from your router to serve web pages, use SSH from outside your local network or set up some sort of media server.
These instructions have been tested and confirmed with Ubuntu 16.04 LTS and Ubuntu 14.04 LTS but should be fine on other versions.
For whatever reason, Ubuntu is trying to make our lives easier by introducing graphical tools to be used by default but kind of making our terminal life a bit harder!
- How to set a static IP in Ubuntu (the quick answer):
- Disable the graphical management of your network connection in /etc/NetworkManager/NetworkManager.conf
- Gather the information for the static IP (interface, IP to be used, default gateway, subnet, DNS)
- Modify /etc/network/interfaces to include the information above.
- Restart networking and network-manager services
These instructions assume you are using a wired ethernet port to set a static IP on and already have an internet connection to create a static IP for (otherwise you would be finding it hard to read this right now!).
Disabling visual (nm-tool) network management
Using Ubuntu’s graphical interface to set a static IP (as described in my previous article about setting a static IP using nm-tool), uses some underlying tools that disable the manual / terminal method which most Linux users are more adapted to.
To regain control of our network interfaces we first have to disable nm-tools’ management of them. Type/copy the following command:
|
1 |
gksudo gedit /etc/NetworkManager/NetworkManager.conf |
Your file should look something like this:
|
1 2 3 4 5 6 |
[main] plugins=ifupdown,keyfile dns=dnsmasq [ifupdown] managed=false |
A few things to do:
- Disable dnsmasq by commenting out the line with a # (hash) at the beginning of the line.
- Set managed (under the ifupdown section) to true.
Dnsmasq offers local DNS caching and network DHCP naming, both of which aren’t necessary on a standard workstation (Some may argue that local DNS caching is useful but I’ve always found Google’s DNS servers to be fast enough). More information on dnsmasq is available from Ubuntu Documentation [https://help.ubuntu.com/community/Dnsmasq].
I find the terminology for ‘managed’ a little confusing here because I have to set this to true to get Network Manager to recognise that I am actually managing this connection manually!
So our NetworkManager.conf now looks like this….
|
1 2 3 4 5 6 |
[main] plugins=ifupdown,keyfile #dns=dnsmasq [ifupdown] managed=true |
Which connection do I use for my static IP?
So, lets have a look at our current network information, open a terminal and type/copy the following command:
|
1 |
ifconfig –a |
You will now be presented with all the available network connections (whether connected or not). Your output should look something like this:
|
1 2 3 4 5 6 7 8 9 10 11 12 13 14 15 16 17 18 19 20 21 22 23 24 25 26 |
ifconfig eth0 Link encap:Ethernet HWaddr 11:26:5d:97:t5:e9 UP BROADCAST MULTICAST MTU:1500 Metric:1 RX packets:0 errors:0 dropped:0 overruns:0 frame:0 TX packets:0 errors:0 dropped:0 overruns:0 carrier:0 collisions:0 txqueuelen:1000 RX bytes:0 (0.0 B) TX bytes:0 (0.0 B) Interrupt:43 Base address:0xc000 lo Link encap:Local Loopback inet addr:127.0.0.1 Mask:255.0.0.0 inet6 addr: ::1/128 Scope:Host UP LOOPBACK RUNNING MTU:16436 Metric:1 RX packets:4390 errors:0 dropped:0 overruns:0 frame:0 TX packets:4390 errors:0 dropped:0 overruns:0 carrier:0 collisions:0 txqueuelen:0 RX bytes:448014 (448.0 KB) TX bytes:448014 (448.0 KB) wlan0 Link encap:Ethernet HWaddr e9:f2:44:e7:b6:a1 inet addr:192.168.0.10 Bcast:192.168.0.255 Mask:255.255.255.0 inet6 addr: fa80::fed5:22fe:fec6:a6b9/64 Scope:Link UP BROADCAST RUNNING MULTICAST MTU:1500 Metric:1 RX packets:92540 errors:0 dropped:0 overruns:0 frame:0 TX packets:60313 errors:0 dropped:0 overruns:0 carrier:0 collisions:0 txqueuelen:1000 RX bytes:107589287 (107.5 MB) TX bytes:9187835 (9.1 MB) |
What are the ifconfig connections?
To elaborate on the connections here:
- lo – this is a loopback connection, a virtual connection used to connect to the machine (itself) only
- eth0 – an ethernet interface (wired port)
- wlan0 – a wireless interface (device)
You may well have more eth interfaces, especially in servers where the machine may need to be connected to the network and other machines. You may well have more wlan interfaces if for some reason you have multiple wireless devices connected to your machine.
Setting a static IP for a wireless interface is a bit different to the instructions contained here (to be covered in the future).
I will be using eth0.
What static IP should I use?
There are some IP ranges reserved for private use. These are:
- 10.0.0.0 – 10.255.255.255
- 172.16.0.0 – 172.31.255.255
- 192.168.0.0 – 192.168.255.255
The exact reason for these ranges is explained *more clearly* on wikipedia.
My personal preference is to use IP’s between 192.168.0.100 – 192.168.0.200. Steer clear of using an IP at the beginning and end of any of the ranges as they are usually used for network administration devices.
So, the IP I’m going to use is 192.168.0.101.
What is my Network Gateway?
Your Network Gateway is the gateway between your network and the Internet, the connection between 2 networks – your network and the worlds!
In most residential broadband set-ups, this will be the router provided by your Internet supplier. In commercial scenario’s, this could be a firewall or other routing device.
To find your current gateway type/copy this command:
|
1 |
ip route show |
The output will show a line containing the word ‘default’, the IP on this line will be the IP of your Network Gateway… sometimes used interchangeably with Default Gateway (sometimes incorrectly).
My default/network gateway is 192.168.0.1 as shown below on the first line.
|
1 2 3 |
default via 192.168.0.1 dev wlan0 proto static 169.254.0.0/16 dev wlan0 scope link metric 1000 192.168.0.0/24 dev wlan0 proto kernel scope link src 192.168.0.10 metric 2 |
What is my Netmask / Subnet?
A subnet is used to divide a network into logical groups – subnetworks. A Netmask specifies the boundaries of a subnetwork. The exact methods in which it does this are outside the scope of this of this post (maybe one for the future!).
To find your subnet, use ifconfig again. Type/copy the following: (REPLACING <iface> with the interface currently connected to the internet eg. wlan0 or eth0)
|
1 |
ifconfig <iface> | grep Mask |
Your subnet is the value after Mask, in 99% of residential router’s this value will be 255.255.255.0.
My subnet is 255.255.255.0.
What about DNS?
DNS (Domain Name Servers) are like indexes which resolve the domain name to an IP. I primarily use Google’s Public DNS but you may choose to use your gateway IP to let your router deal with DNS.
The name servers I will be using are 8.8.8.8 and 8.8.4.4.
Setting the static IP
 To specify a static connection we need to add the information we gathered above to /etc/network/interfaces.
My /etc/network/interfaces file (on every distro I’ve tried so far) was pretty much empty by default (as below), if you have something more you should be careful with removing entries, start by commenting out lines (using #) to see exactly what you are using.
My current /etc/network/interfaces file looks like this:
|
1 2 |
auto lo iface lo inet loopback |
What do I change in /etc/network/interfaces?
There are 5 items to add to this file:
- Static declaration (using <interface> chosen above): iface <interface> inet static
- Static IP address: address <chosen ip>
- Network gateway: gateway <gateway ip>
- Netmask / subnet: netmask <netmask ip>
- DNS nameservers: dns-nameservers <dns ip’s>
Open your /etc/network/interfaces file for editing by typing/copying the following:
|
1 |
gksudo gedit /etc/network/interfaces |
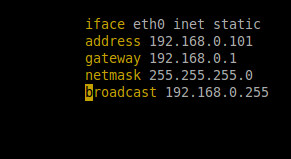
Adding my chosen network interface, static IP, default gateway IP, subnet and nameservers (separated by a space), my /etc/network/interfaces file now looks like this:
|
1 2 3 4 5 6 7 8 9 |
auto lo iface lo inet loopback auto eth0 iface eth0 inet static address 192.168.0.101 gateway 192.168.0.1 netmask 255.255.255.0 dns–nameservers 8.8.8.8 8.8.4.4 |
Restart your networking services
Finally, restart your networking services to put your new settings into effect.
Restarting networking for Ubuntu 15.04 and higher
Since Ubuntu 15.04, the init daemon system was fully changed to systemd, this includes the latest LTS release, Ubuntu 16.04. Though the previous upstart commands are still usable in many cases you should start to use the newer syntax:
|
1 2 3 |
systemctl restart network–manager.service systemctl restart networking.service systemctl restart resolvconf.service |
Restarting networking for Ubuntu 14.10 and lower
Restart the following services with the previous syntax typical of upstart:
|
1 2 3 |
sudo service network–manager restart sudo service networking restart sudo service resolvconf restart |
This should restart your network interfaces and services. Use ifconfig to confirm your new static IP!
Pingback: How to Set a Static IP in Ubuntu – the Semi-Graphical Way! | Sudo JuiceSudo Juice()